Craft supplies and folks to help you with your projects. Supplier of Moda fabrics and wool supplies for applique and rug hooking.
Tuesday, November 12, 2013
You're going to want to try this!
We all know how popular burlap is and you see it all over the place. Well, did you know that you can cut burlap using your Big Shot Sizzix die cutting machine? Yup, just get ready for the mess and off you go. Take it from one who knows, don't wear black when working with burlap,. There are just so many possibilities!
Friday, November 8, 2013
Re-tooled tools
These are the tools we are used to using when taking out stitching that needs to be removed. I've had some of these 'bad boys' for years. And I think every sewing machine you buys these days, has done that comes with it. When we sisters turned 12, our mother purchased a sewing box, filled with sewing goodies for all of us. What a great idea! I think I still have some of those tools, years later.
These certainly do the job when it comes to opening a seam. But like everything else, there is something new and better!
And here it is! What's so great about that? you ask. Well, it's not so much the seam ripper that is different- its the extra part on the end, that is going to be a life saver to you. It is shaped like a honey comb and is plastic. How it works, I can't tell you, no engineer here, just know it does. When you are done opening your seams, you have all those extra threads, that need to be picked out of there, and this little end is there to help with that job. If you move the plastic end over the threads, it picks them up, they end up sticking to this end for easy removal. What a great idea. So this may want to be the tool that you put in your daughter's sewing box!
![]() |
![]() |
| |
And here it is! What's so great about that? you ask. Well, it's not so much the seam ripper that is different- its the extra part on the end, that is going to be a life saver to you. It is shaped like a honey comb and is plastic. How it works, I can't tell you, no engineer here, just know it does. When you are done opening your seams, you have all those extra threads, that need to be picked out of there, and this little end is there to help with that job. If you move the plastic end over the threads, it picks them up, they end up sticking to this end for easy removal. What a great idea. So this may want to be the tool that you put in your daughter's sewing box!
Wednesday, November 6, 2013
Fun toys for grown ups!
If you are anything like me- about this time of year your family is asking for ideas of things to get you for Christmas. There are not many things we need, so our gift list tends to consist of 'wants' So here would be one thing to add on that list if you are a sewer/quilter that uses a rotary cutter a lot. This is a sharpener that you would use when your blades on your rotary cutter are getting dull. Love this! I cut a bunch of fabric using a rotary cutter, including Temtex and nylon net. Both of those fabrics can really do a number to blades, and blades aren't free! So when you feel your blade could use sharpening, run it through this several times- going both ways, and you will have sharper blades.
Thursday, October 31, 2013
Scissors, scissors, who's got the scissors.....
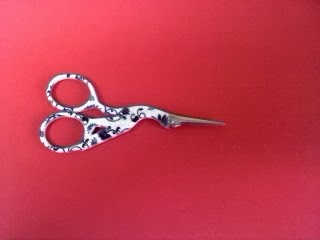
Part 2 of Tools of the trade and we are talking about scissors. Most folks have more than one scissors, and scissors have more than one use! Here we are just showing a few different ones and what might be there uses. You may have many more, or you may be wondering why would any one want more than one! The scissors pictures above is a small 'stork' scissors, this one is great for hand work, cutting threads mostly. A great gift to give that sewing friend who has everything, they can always use one more cute little scissors.
This is a fabric scissors. We have many different scissors in our home, but the fabric scissors is only used for fabric. This scissors has a fob on it to remind family...'fabric only' If you only use your fabric scissors for cutting fabric, and not wool or paper, you scissors will stay sharp longer. When cutting wool of paper, use a paper scissors.
Here you see Fiscars Raggy scissors. These have a small blade that was designed for cutting the seam allowances on raggy blankets. They help you not cut into the sewing and the smaller blade and spring loaded handle help with the cutting.
And I hope every one has one of these scissors. They are the sharpest scissors and have a very fine blade- even way out at the end. I'd hate to drop this on my foot, but they are great for cutting button holes open or for cutting slits with great precision. These are just a few of the great cutting tools out there, hopefully this will help you in your future sewing projects.
This is a fabric scissors. We have many different scissors in our home, but the fabric scissors is only used for fabric. This scissors has a fob on it to remind family...'fabric only' If you only use your fabric scissors for cutting fabric, and not wool or paper, you scissors will stay sharp longer. When cutting wool of paper, use a paper scissors.
Here you see Fiscars Raggy scissors. These have a small blade that was designed for cutting the seam allowances on raggy blankets. They help you not cut into the sewing and the smaller blade and spring loaded handle help with the cutting.
And I hope every one has one of these scissors. They are the sharpest scissors and have a very fine blade- even way out at the end. I'd hate to drop this on my foot, but they are great for cutting button holes open or for cutting slits with great precision. These are just a few of the great cutting tools out there, hopefully this will help you in your future sewing projects.
Tuesday, October 29, 2013
Tools of the trade
We are going to be talking about and showing great tools! The first one is this funny looking thing, called a hemostat. This one was purchased at Harbor Freight for around $3.99, and I wouldn't be without one! It is very handy for turning small arms, legs and ties right side out. So let's see how this bad boy works. Here you see a stitched arm and the hemostat ready for action.
You are going to put the hemostat into the arm, (for our example) and pinch it to the right side of the fabric, now slowly pull the hemostat and work the fabric, so you are getting the right side out.
When you have gotten all that you 'pinched in' on your last grab, reach in farther and 're-pinch' and pull your fabric right side out.
Continue 're-pinching' and pulling until you have your arm turned right side out.
The hemostat is a great tool to have for turning. This maybe a sewing tool you may want to invest in if your sewing and handwork calls for turning many items right side out, especially those tiny items.
You are going to put the hemostat into the arm, (for our example) and pinch it to the right side of the fabric, now slowly pull the hemostat and work the fabric, so you are getting the right side out.
When you have gotten all that you 'pinched in' on your last grab, reach in farther and 're-pinch' and pull your fabric right side out.
Continue 're-pinching' and pulling until you have your arm turned right side out.
The hemostat is a great tool to have for turning. This maybe a sewing tool you may want to invest in if your sewing and handwork calls for turning many items right side out, especially those tiny items.
Thursday, October 17, 2013
Needle troubles
Ever have trouble threading your needle? Sometimes we are sure its just old age, and well, honestly sometimes it is! However, did you realize that needles are 'stamped out' when they are manufactured. So if you are having troubles threading your needle, it may help to flip the needle over and try the other side. I found this especially true when using a #22 Chenelle needle, used for wool applique. So next time you are having troubles you may want to give this handy tip a try, may solve your needle troubles, or you may have to spring for stronger glasses! Have a fun day stitching.
Tuesday, October 8, 2013
Yo Yo Yo
Today we are going to be working on making yo yos. Different patterns call for these, they make great eyes, or flower center, and some people even make table runners and quilts out of them. So to begin, you will need to cut a circle. You can make your circle any size you like. The bigger the circle, the bigger the end yo yo, the smaller the circle, the smaller the end yo yo. Makes sense right?
Find some needle and thread, and knot the one end of the thread, and thread the needle. Begin stitching a 'running stitch' around the outside edge of the circle, about 1/4" from the outer edge. Pull this thread through until the knot reaches the fabric.
You can take several stitches at once, if you like. Here you get an idea of distance from edge and the stitches aren't tiny little stitches, but fairly good sized ones.
Continue to stitch all the way around the outer edge of the circle.
Here we have finished stitching and you can see the beginning knot.
Now gently pull the thread and it will gather up your circle. You will want to tie a knot, to hold your work securely. This is the front side of the yo yo. Some patterns will call for many yo yo, to maybe make the legs or arms of a doll.
Here is the back of your yoyo. There are yoyo makers that you can buy, but you will be doing the same thing, only with a plastic holder to help hold the fabric. Hope this helps you next time you want to make one yo yo or 50!
Find some needle and thread, and knot the one end of the thread, and thread the needle. Begin stitching a 'running stitch' around the outside edge of the circle, about 1/4" from the outer edge. Pull this thread through until the knot reaches the fabric.
You can take several stitches at once, if you like. Here you get an idea of distance from edge and the stitches aren't tiny little stitches, but fairly good sized ones.
Continue to stitch all the way around the outer edge of the circle.
Here we have finished stitching and you can see the beginning knot.
Now gently pull the thread and it will gather up your circle. You will want to tie a knot, to hold your work securely. This is the front side of the yo yo. Some patterns will call for many yo yo, to maybe make the legs or arms of a doll.
Here is the back of your yoyo. There are yoyo makers that you can buy, but you will be doing the same thing, only with a plastic holder to help hold the fabric. Hope this helps you next time you want to make one yo yo or 50!
Subscribe to:
Posts (Atom)


